Overview of People (Person) Pages
The People feature comes with a "Person" content type. There are several fields available on the Person content type. Once you create your individual Person items, they will populate at the "/people" path, and can also be displayed using several widget types.
Note about Name Fields
Due to the immense variety of name- and title-handling standards across the world, we do not have separate fields for first name, last name, courtesy titles, academic titles, suffixes, degrees, or anything else. There is a field for how the name should be displayed, and a field for how the name should be sorted when listed with other names.
How to Create and Configure People Content
Create/Edit a Person Page
From your dashboard or admin menu, use the Person link in the Add Content section to create a new person. From there, configure the fields accordingly:
- Name (for display). Required. This is equivalent to the Title field for other content types. Enter the person’s name as you want it to be displayed. See the "Integration with other features" section on the main People feature page for how this name is used to create relationships between different types of content.
- Sortable name. Required. Enter the person's name in the format you want to use for sorting. For example, if the display name is in the format Firstname Lastname, you might want to sort by Lastname Firstname. If the sortable name is the same as the display name, enter the same value in both fields.
- Role. Choose the person’s general type or role. See the "Person types" section below.
- Job title. If applicable, enter a job or academic title.
- Department. You may enter multiple departments. You will see an autocomplete with suggestions if similar departments have been entered for other people. Select the department from the autocomplete (if there is a match) to prevent multiple spellings of the same department name. Drag departments into the appropriate order. If you also have the Departments feature enabled, you can use it to create relationships between different types of content. See the "Integration with other features" section on the Departments page for more information.
- Bio/CV. This is equivalent to the Body field for other content types. You may use the “Edit summary” link to specify the text that should appear as the Teaser when people are displayed in the available People and other Listings widgets.
- Research Interests. If there are additional research interests to add, add them here. Separating research interests by comma is a good way to ensure that they will be displayed well on the various People listings widgets.
- Email/External Link/Address/Telephone. These are the fields for general contact info.


Person Types (Roles, a.k.a. categories)
By default the feature includes four person "Roles," or types: Faculty, Researcher, Staff, and Student. Site Builders can add, edit, and delete person types. Many of the People widgets can be filtered by Role (type).
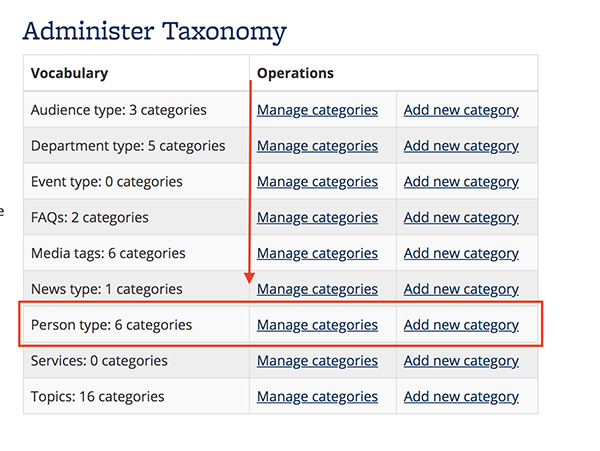
To add a person type, go to your dashboard and follow the Add new category link in the row for Person type in the Administer taxonomy section:
To edit or delete a person type, follow the Manage categories link in the row for Person type in the Administer taxonomy section.
Do not delete all of your person types. You should always have at least one person type available, or the person type select list on the Person edit page will be empty.
Photos
The Person content type includes an option for uploading a photo that will display on the individual Person page, as well as in some of the available People listing widgets (and other listing widgets).
If you do not upload a photo to accompany the Person, a default image of the campanile will display instead. You can customize your own default image if desired.

To designate your own default image, go to the "Open Berkeley" tab on the Site Builder dashboard, then select "People Settings."

Then, upload your photo, and hit "Save Configuration."

Notes about photos on Person pages:
- Photos should be landscape photos. If you only have portrait photos, you can use a photo editing tool like Photoshop to either adjust the image, or use this Photoshop template provided by Public Affairs, which will help you "transform a portrait image to a landscape image."
- Photos must be at least 768x512 pixels.
- If a photo is in more of a square-type shape, but still fits in the required dimensions, then it may be automatically cropped in order to fit the default rectangle shape. You can use a photo editing tool like Photoshop to adjust a photo if it's not displaying as desired in the rectangle shape.