- This feature is sponsored by People & Culture.
Overview
Site builders who are comfortable editing HTML directly can add expanding/collapsing (accordion) content sections (the expand/collapse functionality is used on this very page!) to any content page or text widget.
Once you have inserted an expanding/collapsing section, you will be able to edit it using the WYSIWYG.
Adding a collapsible content chunk
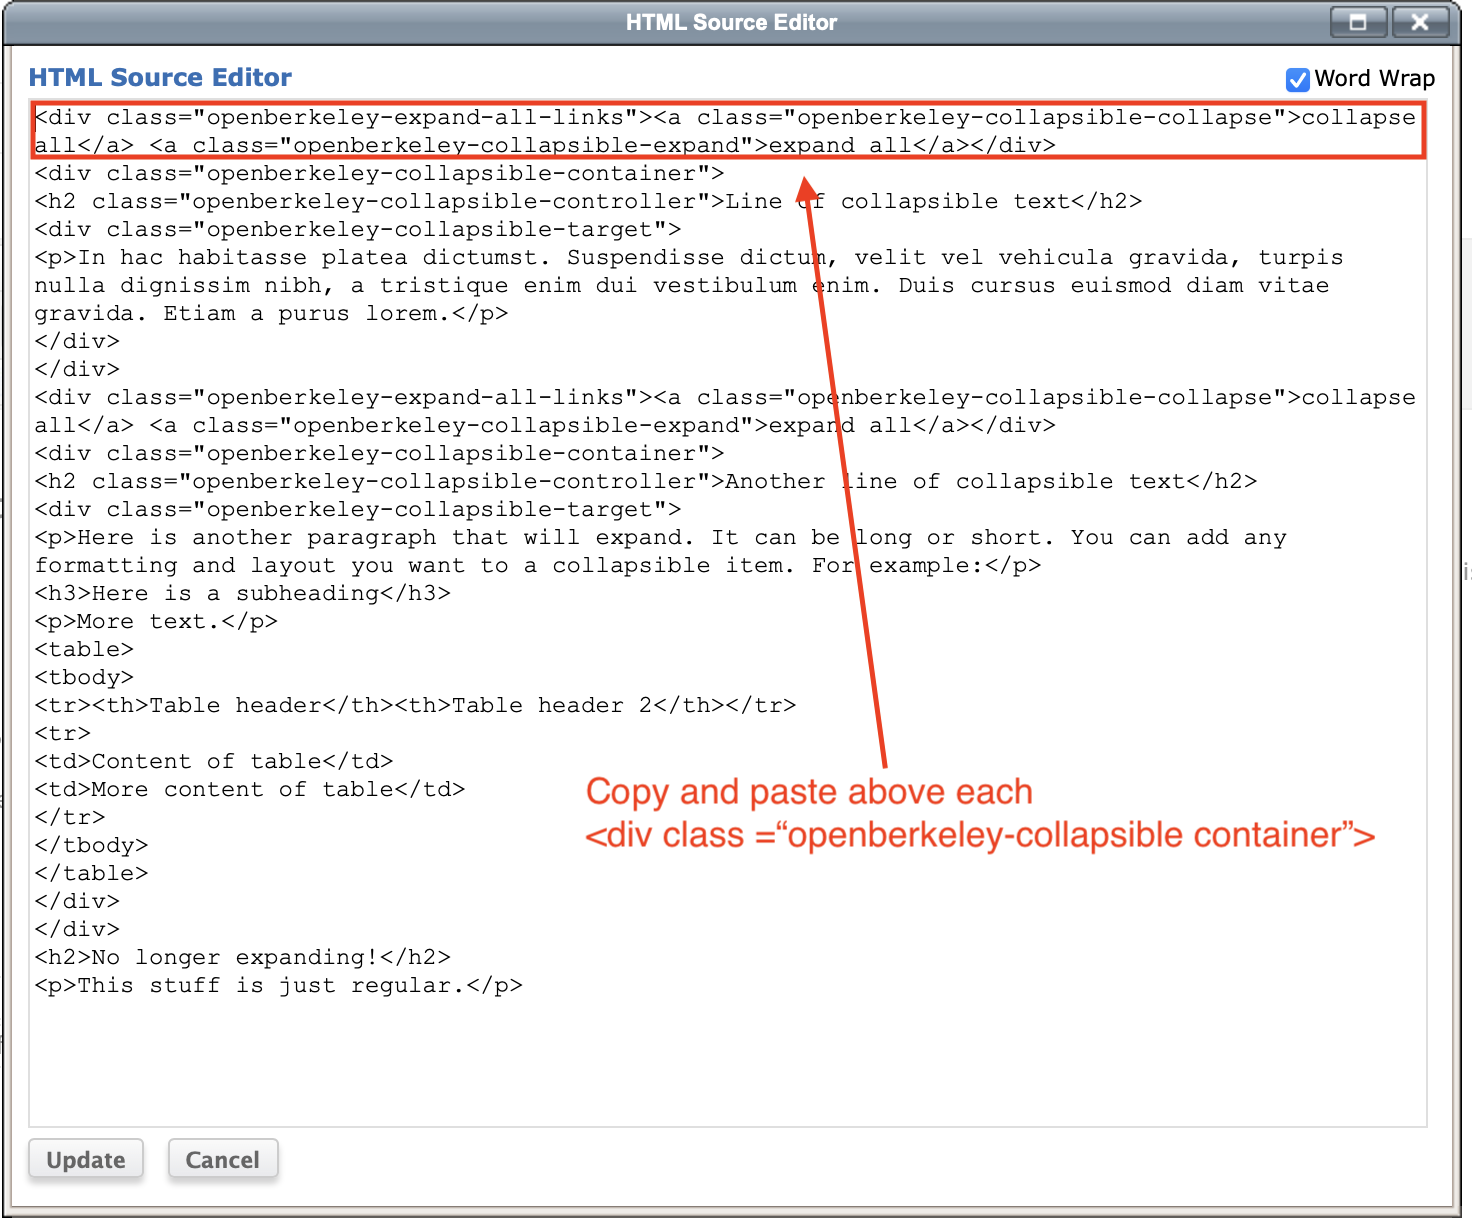
Expand the WYSIWYG toolbar so that you see the HTML button. When you click the button, a popup will appear where you can edit the HTML of your content directly.

HTML editing window:

Each collapsible content chunk must have a container div around the whole chunk, a heading that serves as the controller, and a target div that surrounds the content that you want to expand/collapse. You must use the correct tags and class names for each item, otherwise the expand/collapse won’t work.
- For the container, use a div with class="openberkeley-collapsible-container"
- For the controller, use a heading (h2, h3, h4, or h5) with class="openberkeley-collapsible-controller"
- For the target content, use a div with class="openberkeley-collapsible-target"
Copy and paste the below sample code into your HTML editing window. You can add this text even if there is already content/HTML in the window, just take care to copy and paste the sample code in the correct place.
In the below sample code, replace the text in the <h2> (the controller heading) tag and the <p> (paragraph target content) tag with your expand/collapse text.
Example (copy and paste into HTML window to get started)
<div class="openberkeley-collapsible-container">
<h2 class="openberkeley-collapsible-controller">Line of collapsible text</h2>
<div class="openberkeley-collapsible-target">
<p>In hac habitasse platea dictumst. Suspendisse dictum, velit vel vehicula gravida,
turpis nulla dignissim nibh, a tristique enim dui vestibulum enim. Duis cursus
euismod diam vitae gravida. Etiam a purus lorem.</p>
</div>
</div>
<div class="openberkeley-collapsible-container">
<h2 class="openberkeley-collapsible-controller">Another line of collapsible text</h2>
<div class="openberkeley-collapsible-target">
<p>Here is another paragraph that will expand. It can be long or short. You can add
any formatting and layout you want to a collapsible item. For example:</p>
<h3>Here is a subheading</h3>
<p>More text.</p>
<table>
<tbody>
<tr><th>Table header</th><th>Table header 2</th></tr>
<tr>
<td>Content of table</td>
<td>More content of table</td>
</tr>
</tbody>
</table>
</div>
</div>
<h2>No longer expanding!</h2>
<p>This stuff is just regular.</p>
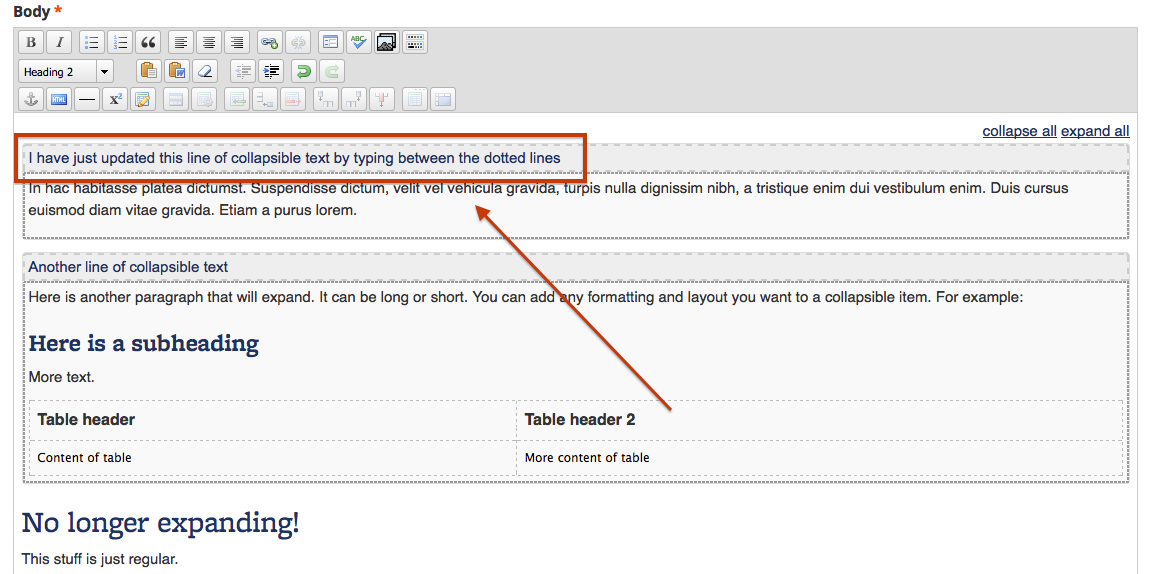
When you are done, click Update. You will see your changes reflected in the WYSIWYG editor.

Each controller and target will be displayed in the editor with a dashed or dotted border. These borders will not be displayed when you view the saved page. Once you have created a collapsible content chunk in the HTML popup, the borders will help you edit your content later without needing to open the HTML view.
When you visit the page, all content chunks start off collapsed. Click the controller heading to expand. The expand/collapse function has been tested for accessibility, and works well for keyboard-only users and screenreader users.

Expand/Collapse All
If you want, you can add links to expand and collapse all of the items at once. Open up the HTML editor and paste this code just before your first collapsible item.
<div class="openberkeley-expand-all-links"><a class="openberkeley-collapsible-collapse" href="#openberkeley-expand-all">collapse all</a> <a class="openberkeley-collapsible-expand" href="#openberkeley-expand-all">expand all</a></div>
There can only be one set of expand all/collapse all links per page.

Editing the collapsible content
Once you have inserted a collapsible item, you do not have to go back to HTML mode to edit it. Site builders and editors will be able to edit the text of the heading and the collapsible content.
In the edit view, you will see a dashed outline around the heading, and a dotted outline around the collapsible content. This is in addition to the styling that appears on the public view of the page, which will differ depending on what theme your site uses. The outlines let you see whether content is inside or outside of a collapsible chunk.

Notes
- For best display, keep the heading text short.
- If a collapsible item is the last thing in your page content, it will be difficult to add non-collapsible content below it without going into HTML mode. When editing in HTML mode, you might want to leave an empty <p> tag after the last collapsible item. Similar issues may occur if you are trying to add non-collapsible content between two collapsible items, or if you are trying to delete all of a collapsible item. You may need to go into HTML mode to make these changes.
- There can be only one set of expand-all/collapse-all per page. These links will act on all collapsible items regardless of their location on the page. For this reason we recommend that you do not put collapsible items into multiple panes on a single page.
